Top Elements

- Back to Chapter: Returns you to the table of contents, in the chapter where the article is located.
- Article Associations: Shows where the article belongs, including its manual and chapter.
- All Changes Are Saved: Confirms that your changes have been saved. Changes in the article editor are saved automatically.
- Preview: Opens a draft preview of your changes on the published site so you can review the article before publishing.
- Publish: Publishes the article.
Article Outline, Title, and Collaboration

- Outline Opener: Opens the article’s outline view.
- Article Title: Displays the article title. Select the pencil icon to edit it, then click outside the title field to save the change automatically.
- Author Initials: Shows the initials of authors who are currently in the editor. When more than one author is present, you will see multiple sets of initials.
- Comments Icon: Opens the comments sidebar so you can review comments that people have left.
Editor Menus
The menu bar provides access to exporting, revision history, editing commands, content insertion, formatting, and Clarify tools.
File Menu
Use the File menu to export content, work with revisions, or switch between an article and a workflow.
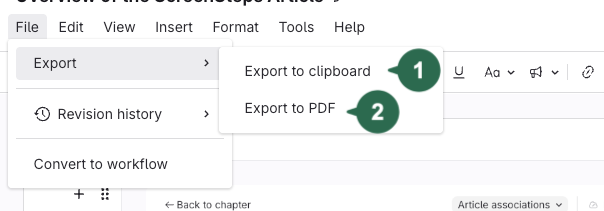
- Export to Clipboard: Copies the article content to your clipboard so you can paste it into another system.
- Export to PDF: Exports the article as a PDF.
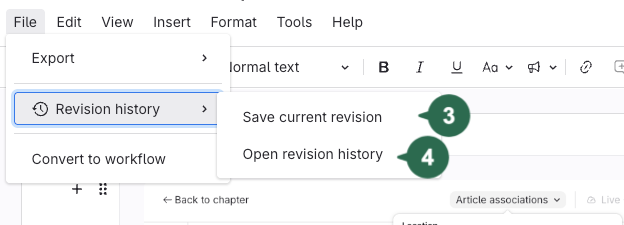
- Revision History: Save Current Revision: Saves a specific revision without requiring you to publish the article.
- Revision History: Open Revision History: Opens the article’s revision history.

- Convert to Workflow: Converts an article into a workflow, making questions and checkpoints available.
Or...
Convert to Article: Converts a workflow back into an article.
Edit Menu
Use the Edit menu to undo changes, select or copy content, split content into a separate article, and find or replace text.
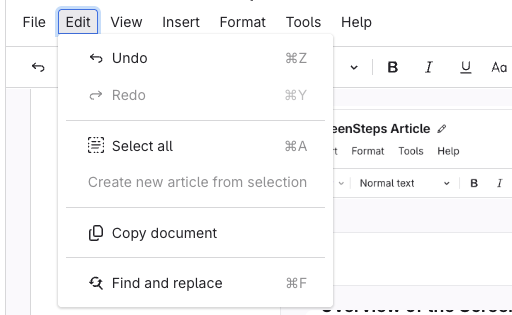
- Undo: Reverses an editing action.
- Redo: Reapplies an action that you undid.
- Select All: Selects all content in the article.
- Create New Article from Selection: Cuts the selected content from the current article and creates a new article containing that content in the same chapter.
- Copy Document: Copies the document to your clipboard.
- Find and Replace: Finds text within the article and allows you to replace it.
View Menu
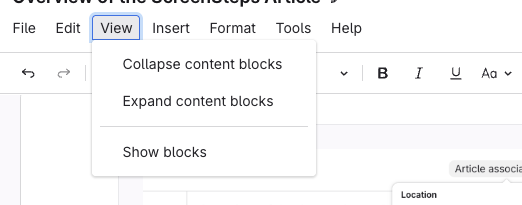
Use Collapse Content Blocks and Expand Content Blocks to collapse or expand the article’s content blocks.
The View menu also includes Show Blocks.
Insert Menu
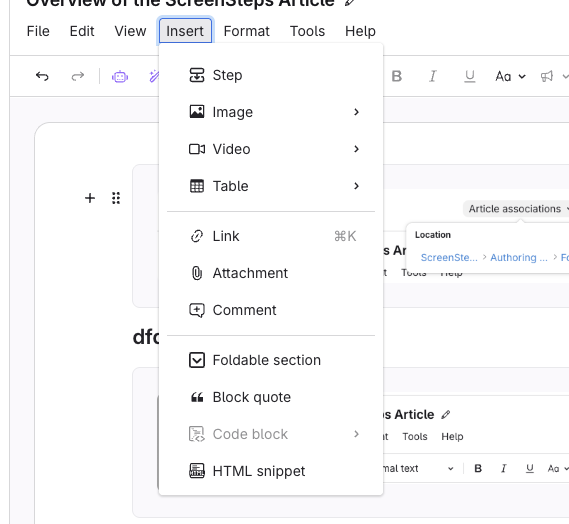
- Step: Insert a step content block.
- Image: Insert an image (image will be inserted where the cursor is).
- Video: Insert a video you've saved on or record a new video from scratch.
- Table: Insert a table.
- Link: Insert a link.
- Attachment: Insert an attached document/file.
- Comment: Insert a comment (which is an internal comment for other authors).
- Foldable Section: Insert a foldable section.
- Block Quote: Insert text that is styled as a Block quote.
- Code block: Insert text that is styled as a code block.
- HTML snippet: Insert HTML such as embed code or other HTML text.
Format
Use the Formatting menu to change the appearance and structure of your content.
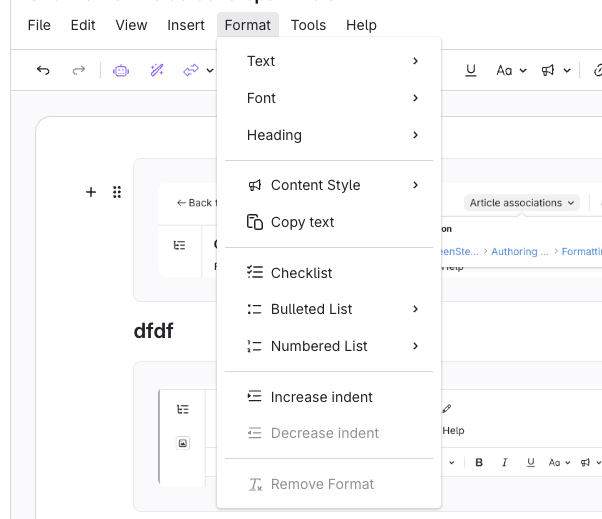
- Text formatting: Bold, italic, underline, strikethrough, superscript, subscript, and code
- Font: Font color and font background color
- Headings: Heading styles
- Content styles: Modify the style of the text to pre-formatted style of Normal, Introduction, Info, Alert, Tip, Warning, and Prompt
- Checklist: This allows you to create checklists which act as foldable sections as well.
- Bulleted list
- Numbered list
- Indentation: Increase indent and decrease indent
- Remove Format
Tools
The Tools menu includes Clarify Check, Clarify Assistant, Clarify Create, and Clarify Transform.
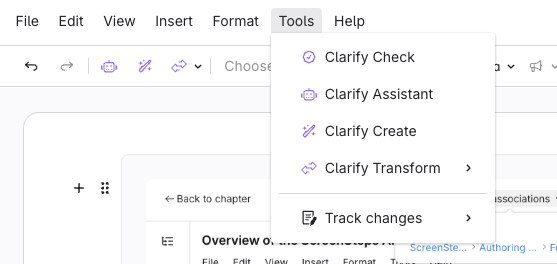
Clarify Check
Compares content in the current article with other articles in ScreenSteps to identify potential duplicates and potential conflicts.
Clarify Assistant
Opens a free-form prompt box where you can describe what you want it to do.
You can use it to create content from scratch or work with selected content. For example, you can ask it to draft an overview article about a particular topic, translate selected text into another language, or revise content according to your instructions.
Clarify Create
Helps you create article content from information you provide, including:
- Voice recordings and audio files
- Pasted text, such as a transcript from a video recording
- PDFs and Word documents
- Use it to turn information from outside ScreenSteps into article content.
Clarify Transform
Provides built-in prompts for transforming existing content in your ScreenSteps article.
| Goal | Available transformations |
|---|---|
| Change the type of content | Make content actionable or foundational |
| Shorten content | Summarize |
| Change the format | Convert to a table, numbered list, bulleted list, or paragraph |
| Organize branching information | Convert to a decision tree |
| Improve accessibility | Apply the available accessibility prompts |
Editor Toolbar

- Undo, Redo, and Clarify Shortcuts
The first group of toolbar controls includes Undo, Redo, Clarify Assistant, Clarify Create, and Clarify Transform.
- Clarify Assistant
Opens a free-form prompt box where you can describe what you want it to do.
You can use it to create content from scratch or work with selected content. For example, you can ask it to draft an overview article about a particular topic, translate selected text into another language, or revise content according to your instructions.
- Clarify Create
Helps you create article content from information you provide, including:
- Voice recordings and audio files
- Pasted text, such as a transcript from a video recording
- PDFs and Word documents
- Use it to turn information from outside ScreenSteps into article content.
- Clarify Transform
Provides built-in prompts for transforming existing content in your ScreenSteps article.
Goal Available transformations Change the type of content Make content actionable or foundational Shorten content Summarize Change the format Convert to a table, numbered list, bulleted list, or paragraph Organize branching information Convert to a decision tree Improve accessibility Apply the available accessibility prompts - Headings
Lets you choose normal text or a heading style.
- Text, Headings, and Content Styles
Select the text you want to format, then use the toolbar controls to apply your changes.
Control What it does Bold Applies the selected text formatting. Italic Applies the selected text formatting. Underline Applies the selected text formatting. Font Changes the text color or background color behind the text. Subscript Applies subscript formatting. Superscript Applies superscript formatting. Paragraph / Content Styles Modify the style of the text to pre-formatted style of Normal, Introduction, Info, Alert, Tip, Warning, and Prompt - Hyperlinks
Use the hyperlink control to connect readers with related content inside or outside ScreenSteps.
Link destination How you can use it Another ScreenSteps article Link to a related article using ScreenSteps’ built-in article linking system. A manual or chapter Direct readers to a manual or chapter in ScreenSteps. An external resource Link to a resource outside ScreenSteps. A heading in the current article Direct readers to a specific section—for example, when creating a table of contents within the article. - Comments
Use the toolbar’s comment control to add a comment to specific content.
- Steps
Inserts a step content block.
- Images
Inserts an image.
- Tables
Inserts a table.
- Lists, Indentation, and Removing Formatting
Control What it does Checklist Formats content as a checklist. Bulleted List Formats content as a bulleted list. Numbered List Formats content as a numbered list. Increase Indent Increases the indentation of the selected content. Decrease Indent / Outdent Decreases the indentation of the selected content. Remove Format Removes formatting from the selected content. - Track Changes
Toggle Track Changes on to track edits as you work. Deleted content appears in red. Added content appears in green.